Before and After - Getting Ready for Summer With An RV Renovation
It’s not often that I write a post about myself except in the context of how I’ve helped my clients achieve their dream home. Today is a bit different because this RV renovation is a personal project for me. My husband and I are outdoor enthusiasts and spend a lot of time throughout the summer travelling in our RV. As a designer it’s important to me that all of my spaces, even the RV is functional and a space filled with beauty.
How It Started
We both did a lot of camping growing up. Sometimes it was a simple weekend trip into the great outdoors. We didn’t have to travel too far from home and we could spend our time in nature fishing, hiking, swimming and best of all enjoying campfires every night.
And a few times a year we took vacations that lasted a week or two. This was our way to experience new cities. We could always find a local campground where we could set up a home base. This allowed us access to both city life and all that offered along with a bit of nature. Looking back, I think this was just an affordable way for a family of 6 to vacation together.
Our Passion for RV’ing

We weren’t able to do much camping while our daughter was young because my husband worked weekends. Several years ago that changed and we knew the time had come to get back into the great outdoors. In 2017 we purchased our RV.
There is nothing like sitting outside until darkness falls, listening to the sounds of nature slowly fade as every creature goes to sleep. It’s pure joy to be looking up at the night sky where you see more stars than is possible under the glare of the city lights and then awakening to the chatter of all those creatures the next morning.
In contrast, I love hitting the road for a real adventure and visiting small towns and cities that we’ve never been to. Sometimes we're camping along the ocean and other times we're nestled near a vineyard. Getting to the destination is just as much fun as the destination itself.
The Decision to Renovate

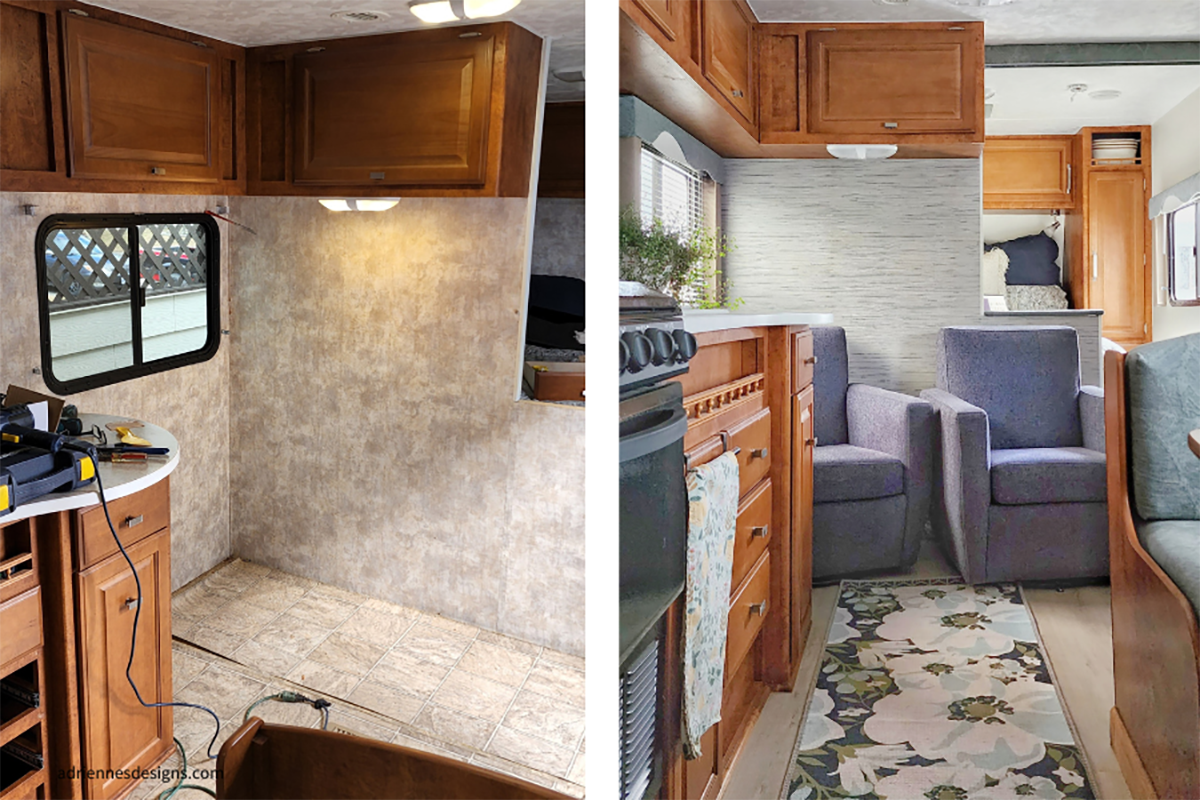
Have you ever heard the expression “the cobbler’s children have no shoes”? This is exactly how I felt as a designer travelling in a dated and tired RV. Our RV was built in 2008 and you could tell from the decor. In case you don’t remember, brown was the colour of choice at that time. Before we renovated it was a mix of horrible patterns and colours with brown woven into every part of the design. I decided early that I wanted to avoid using any trends in my design. Instead, I created a palette using my favourite colours and patterns rather than the latest trendy neutral. This means we can enjoy our RV for a long time and avoid another renovation before we’re ready.
The decor wasn’t the only thing that needed my attention. We had functional issues that made it hard to enjoy, particularly for my husband who is 6’4”. We had a banquette seat that was only 16” high so this was a bit challenging for him to get in and out of. Since we don’t always have access to a picnic table we rely on our dining area to function well.
Our RV was built to sleep 6 but it’s usually only us so we sacrificed one of the sleeping areas to upgrade our seating. We removed an uncomfortable sofa bed and replaced it with 2 swivel chairs. This gives us a comfortable place to hang out inside the RV while we’re having morning coffee or if the weather isn’t cooperating.
Purchase New vs Renovate

Prior to purchasing this RV we had an 8ft camper for the back of our truck that we renovated. We decided to upgrade to a trailer because we were doing a lot of long distance touring and it was a pain to unhook all of the services and pack everything up every time we wanted to go sightseeing for the day.
We weren’t interested in buying a new RV mostly because of the price tag. Yes, everything would be new but our camping season is quite short. We agreed that it didn’t make sense to spend $40,000 on a new RV when we could customize this one and it would end up being everything we wanted.
Personalizing RV’s has become quite popular because a lot of people are using them as travelling hotels nowadays. You can travel and still have all of the comforts of home and that’s exactly what we wanted.
The Budget Breakdown
Our budget for this upgrade was $8,000. As a designer I know how important it is to create a realistic budget and stick to it. We wanted to update a lot in this renovation although most of the items were low ticket items. Here’s what our wish list included:
Replace flooring - replace linoleum with LVP
Raise the height of the banquette + add new trim to base and cabinet bases
Remove wallpaper border
Prime and paint existing wallpaper
Add new wallpaper behind sink - a scrubbable grasscloth look for easy cleaning
Replace shower wand
Replace cabinet hardware
Reupholster the banquette and window cornices
Remove the couch
Add 2 swivel chairs - custom Vangogh Designs
Replace bulbs with LED
Add shelving for better storage
Add decor
Add exterior LED strip lights
Add backsplash to bathroom vanity
Products We Used and Why

FLOORING - Homespro LVP - 5mm thickness, 12MM wear layer, 100% waterproof, stain resistant, VOC Free, click installation.
We wanted a product that would be durable but not too heavy. The flooring needs to withstand +40 degree C in the summer and -40 degree C in the winter.
PRO TIP - using a click installation ensures that you don’t get gapping with temperature fluctuation.
PERFORMANCE UPHOLSTERY FABRICS - used for the banquette and cornices.
Vinyl and leather are good options for durability and stain resistance but I prefer the softness of fabric. Performance fabrics are stain and water resistant, mold and mildew resistant and don’t fade as much as regular fabric.
PEEL AND STICK TILE - backsplash for the bathroom sink.
Tile isn’t an option because it will crack and fall off the wall while the RV is being towed.
Peel and stick is lightweight and washable so a great alternative.
KITCHEN BACKSPLASH
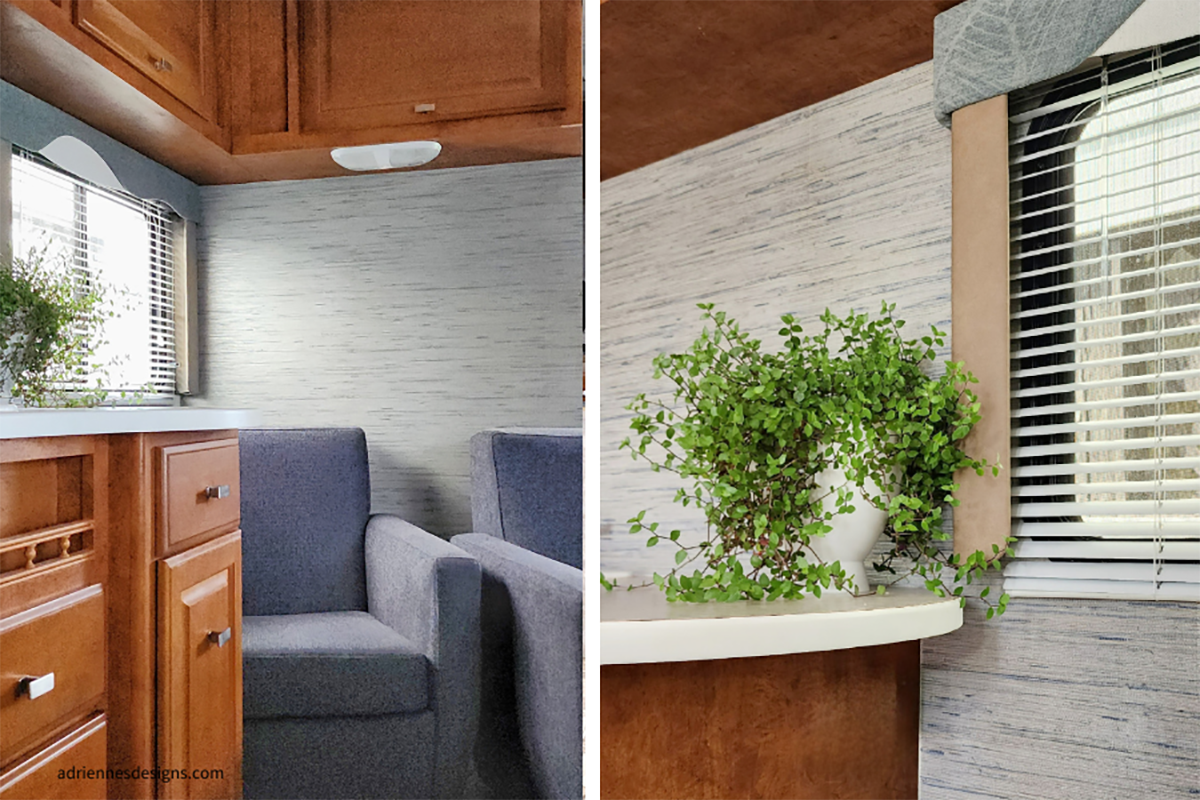
I opted for washable wallpaper for easy clean up. I wanted to add a bit of texture to the kitchen walls so I chose a wallpaper that has a grasscloth look.
PAINT - Benjamin Moore Aura Exterior Paint
We chose an exterior paint to withstand the temperature fluctuations as well as deal with moisture and humidity.

Special RV Considerations

When you renovate an RV you may be tempted to use the same products that you love in your home. An RV has different considerations and you need to consider the weight of anything you incorporate.
Our bathroom sink and toilet are acrylic rather than porcelain. The walls are a thin wallboard (rather than gyprock) that is covered with a really thin wallpaper. Flooring is typically sheet vinyl. Luckily there are a lot of great options for us on the market now.
How This Differs From a Home Renovation
An RV renovation is really no different than renovating a home. The same planning process is required and it’s just as important to create a budget and plan your materials (if you want a copy of my Renovation & Design Planner you can find it here).
Just like a home renovation we need to give ourselves time for products to arrive. We ordered everything so that when we were ready to start the demolition all the items were ready. The custom swivel chairs from Vangogh took the longest to arrive but we knew that and planned accordingly. They didn’t affect the progress because they were the last items to be installed.
Our Biggest Challenges
No renovation is without surprises along the way so we were prepared. As I always tell my clients, when we pull back the layers there will be something interesting waiting for us.
Once the flooring was removed we discovered a leak in the bedroom. This meant we needed to replace the plywood but on the upside, it could have been much worse if we had waited. It turns out the water was coming into the RV from a crack in the mini gutter on the exterior. This was an easy fix and silicone got us back on track.
Next we removed the cornices to paint and discovered that the wallpaper was puckering. My husband used a heat gun to smooth it out as much as possible but in the end we had to reinstall the cornice because it wasn’t perfect.
Have you ever heard about someone waiting months for their new furniture only to find it wouldn't fit through their home’s door or condo’s elevator? Well just imagine trying to find furniture that will fit through an RV door. It took me a while but I ended up loving Vangogh Designs’ Noah swivel chair. It worked although it was a tight squeeze!
Getting Everything On Our Wishlist

Being realistic about what could be included in our RV renovation was important. There were things I would like to have included but I know this has to be treated differently.
In a perfect world I would have replaced the light fixtures with something similar to what I have at home. The options for RV lighting are pretty limited. The light fixtures we have run off a 12-volt battery whereas residential fixtures run off 120-volt wiring. In the end we decided to stick with what we already had since the options were no better.
I was hoping I could remove the dated cornices from around the windows but it turns out they’re hiding the ugly metal frame around the windows. We decided to keep the cornices and instead we upgraded our fabric.
If the budget had allowed it I would have replaced our horizontal window shades with a cellular shade that has the top-down, bottom-up feature. This would give us the same light control we have with our current shade but in the end we decided staying within budget was more important.
Considering an RV Reno? Here’s My Best Advice

My advice is similar to the advice I give with a home renovation. Try to determine any repairs that will be required before you get started. Look for leaks as well as damage to appliances, toilets, water heaters and faucets. This applies to the exterior of your RV as well.
Do your research if this is a DIY project. There are lots of videos online about laying flooring, painting RV walls, etc.
Lastly, ask yourself these questions:
Who are you renovating for and how long do you intend to keep the RV? This will help determine your level of investment.
Once you’ve determined your investment, commit to sticking with it.
Put together a materials list and start pricing the materials. Price out labour costs if you can’t DIY the project. Just like with a home renovation, you should never start a demolition until you have a plan and have established a budget.
Compare costs to your budget and you’ll begin to see what will fit into your budget. Now you can prioritize your wants versus your needs.
My Favourite Part of the RV Renovation

I love it all but my favourite part has to be the new chairs. Our first trip after the renovation was to Lake Chelan in Washington State. We spent 3 days exploring the wineries and lake scenery before heading to Oregon and then to Lake Coeur D'alene in the state of Idaho. It was a 10-day trip and during that time it was cold and rainy almost every day. This meant that we spent a lot of time inside the RV.
The practical changes like replacing the sofa with the chairs and raising the banquette height really made a difference to our level of comfort. We ate every meal inside and played games so this would have been a remarkably less comfortable experience prior to the renovation.
I hope you’ve enjoyed seeing my RV renovation. If you need help with your RV renovation design, I’d love to discuss it with you. It was so much fun and I would love to do it again. My husband keeps threatening to sell this one so we can do it again!
Warm regards,
Adrienne